Envdost, the protect your .env with your biometrics and password.
Securely save you .env file in 3 steps. Use your fingerprint and faceid to authenticate. Never loose you project's api keys and secrets.


Hello there, 👋
I am Saroj
Back again with another exciting and important project. So, without wasting time let's take a deep dive into the journey of building the project along with the funny and painful learning experiences gained. Let's talk about the problem first and then we will move towards the solution and my learning experiences while building this solution.
Backstory 🔙
When I was in high school I used to program a lot in my school and used to continue my projects in the computer lab ( not bragging but when others used to play games🤫 ) I had a problem back then that comes with having two work environments. syncing files, and syncing project secrets. While you can use Github, bitbucket or any other version control system to sync your project files, and you can use password managers to sync your browser passwords. But since we don't usually push our project secrets in the version control. We have one easy option, which is mailing the .env files, or sending their contents through social media ( Which is the worst way in terms of security 😅) And thanks 1password for organizing a hackathon which made it possible for me to think of the solution for this problem.
Another problem that working professionals might face is having to sync their secrets between two different workspaces i.e. home office and actual office.
so what is the solution?
Dear readers, No more sending env content through social media or sending a self-mail to sync your env files.
Introducing Envdost
A CLI tool (friend) to securely store your config/env files with ease & retrieve them easily regardless of the work machine. Be at work or home machine sync and update env files with ease with just 1-3 commands at max. Manage your env files with the security of #1password.
so, how does it work?
Create a project using
createcommand :⬢ projects ⚡ Office ◉ > envdost create todoAppSelect the created project using
setcommand :⬢ projects ⚡ Office ◉ > envdost set todoAppPush the
.envsecrets using thepushcommand :⬢ projects ⚡ Office ◉ > envdost push .env
This is literally it, what you need to do to make your life easier. The .env is stored safely as long as you have your 1password account under control.
( wait wait wait..... how do I get it back ?? )
Don't worry it's a piece of cake 🍰 getting those files back. Here are some steps.
Set the project using the
setcommand :⬢ projects ⚡ Home ◉ > envdost set todoAppPull the files using the
pullcommand :⬢ projects ⚡ Home ◉ > envdost pull .env
There you go, you have your file back.
Is it this easy ??🙀 Dear reader, yes it is.
Is this the whole project? you may ask it is just the tip of the iceberg the shiny glacier tip that everyone sees, there are hidden features in the depths. Are you ready to explore the depths of envdost ? Huhh dost? ( Dost means friend, in my language, it's more like slang than an actual word but it means friend. Huhh means asking for confirmation )
so, let's first see what are the features of envdost? Before explaining that let us see how the data is stored by the envdost and how it uses 1password CLI and if it uses 1password CLI why do we need it?
How is data stored by envdost?
This is what happens when you use the create command to create a project a vault with the project name is created in 1password. So, each project in envdost represents a vault in 1password.

Now, you might say how is it creating a vault when we create a project? As I already said it uses 1password CLI and makes it easier and faster for developers to save their secrets. It calls the 1password CLI with the correct flags and commands to create a vault or vaults when you use create command.
let us see, how it stores our env files.
For storing env files we first select the project, which will fetch the vault id from your 1password account and with the help of that we will create an item in 1password. Each item represents each secret file in your project generally .env file. So, when you use push command, it parses the file. What do you mean by parsing the file? I mean it processes the files and generates a set of key-value pairs which can then be stored in your 1password account.
Here is how it generates key-value pair.
let's say this is your .env file.
1. API_KEY=your-api-key
2. API_SECRET=your-api-secret#this is my very private key
By the way, I used Rix to generate the
.envfile. Don't know about Rix 😱, check my blog on testing it we will have fun 🍵 click here 👈
Envdost will break this .env file into something like this:
1. # main label 1
|____ API_KEY # field name
|____ your-api-key #value
2. # main label 2
|____ API_SECRET #field name 1
|____ your-api-secret # value 1
|____ Comment #field name 2
|____ this is my very private key # value 2
location # main label 3
|____ relative path of file to your code # value
This is how it is stored let me show you the storing of the above example .env file.
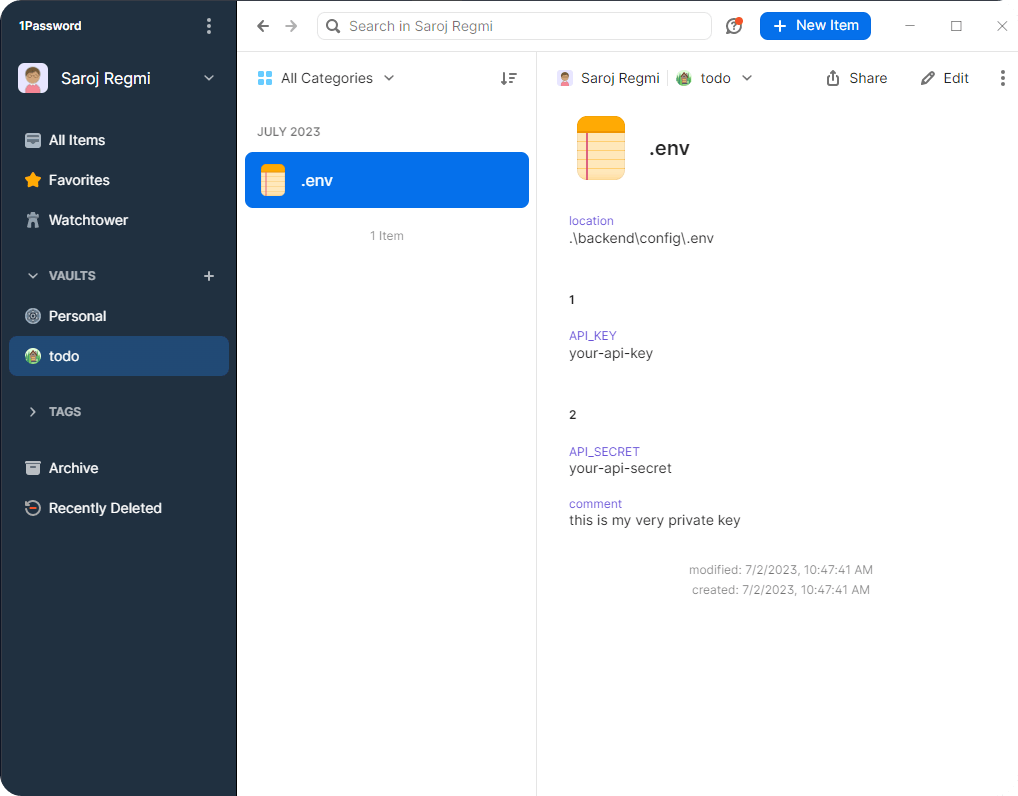
Look it even saves your comment so, that when you want to get it back you get it with exact formatting along with your comments.
And for those of you who want an extra sprinkle of security on top of this, there is a reference mode.
HUHH what is a reference mode?
It is a mode in which you can get the secrets through reference, not in the actual text version but a reference to their storage in 1password which means god forbade even if your .env files get into bad hands they will get a reference to your 1password storage location. God knows how it can be compromised 🤣. Anyways after setting your vault with items which are your files and populating the items with the correct data which is your actual secret in a manageable order. Now fetch the data.
To fetch the data you can just call pull command with the name of your .env file.
what ?? ohh you forgot the file name that you pushed??
No worries my friend, it is called envdost for a reason. Pass no name or what you remember with the pull command. If you pass nothing it will fetch all the .env files inside your project or if you pass something then it will pull only the matching files. And if there is no match it will just give you the files that are stored in your project. Let's see it in action, shall we?
⬢  highliter ⚡ main ◉
> envdost pull
looking for config files in project todo ⣟
Fetching content of .env ⢿
File .env created successfully.
Completed writing to file .env
See, since there was only 1 file in our project, envdost pulled that one file.
what if you misstyped the file name?
⬢  highliter ⚡ main ◉
> envdost pull .envees
Pulling abc from project todo ⢿
There is no file with the name abc
Is you file name listed?
.env
See, it will give you the file's name that it found. If nothing is listed then there are no files in the project.
What about reference mode then?
Ok, let me show you, my friend.
> envdost pull .env -r
Pulling .env from project todo ⢿
Fetching content of .env ⡿
File .env created successfully.
Completed writing to file .env

#contents of .env file

API_KEY='op://todo/.env/ 1/ API_KEY'
API_SECRET='op://todo/.env/ 2/ API_SECRET'
#this is my very private key
You can see, we got a reference of where our data is stored in 1password.
Interesting Huh?? Give it a shot, and open the issue if you found any bugs or mistakes. My socials are always open for you. v1.0.0
If you want to learn about what each command does and how to use it, Be my guest and visit this repo and read the readme. ( It was hard to document than to code it. 🤫 ).
My learning Experiences :
It was my first time using go lang as well as 1password CLI. When I searched what is the best language to write CLI tools in, I got Rust and Go lang are the best. I chose to use Go lang because I heard Rust is very hard and Go is easy. I don't know if that is a myth or not since I haven't coded hello world in Rust yet.
Why chose the easy one 🤔?
Because, you cannot spend your time learning a language that much when you have only 5-6 days to work on a project while you still don't know the tools that are going to be involved.
Ok, The one password CLI was good, but I had to search and read a lot of things before even getting started. I know it was almost 2 days that I took to figure out what and how I was going to make it for this hackathon. The setup of 1password CLI was easy and thanks 1password team for giving us developers free access to your service throughout this hackathon, and Special thanks to Jason Harris for staying in touch despite being in a vaccination.
So, once I got a hang of what 1password can do and decided what and how I am going to make the project, I installed Go. It was going smoothly, and I was going through the documentation It was fun. Everything was working and finally, I installed go, cobra (A tool to make CLI tools in go) and was installing cobra-CLI it installed but the command cobra-CLI was not working. I googled asked AI, searched did everything I knew what was the error it said something was not in the path. ( to be honest, it said the cobra command was not found 😅, from my exp I know it means path error). I deleted the Go Lang itself 3 times 🤣. I lost count of how many times I repeated installing and uninstalling Cobra and Cobra-Cli. I found solutions and suggestions saying GOPATH should be in environment variables, I did that.
Finally, as a last attempt. I joined Go Lang's Slack channel and asked this question in the newbie channel. It was amazing seeing how helpful the community was, I got my answer and found out that the GOPATH should be an environment variable as well as inside a vath value. That one misinterpretation of documentation cost me my day.
Special thanks to:
Aayush Gupta
Tim Heckman
John Maguire
For their help, support and kindness they are the most active people on the channel helping people with their valuable time. I will like to kingly thank them for their help from the bottom of my heart.
And If you are a Gopher then I highly recommend you join the Slack community.
Here is the link to the community. 👉 click me
Anyways I learnt a lot during this hackathon. It help me boost my confidence using the CLI tools and taught me several things.
Here is the list of things that I learnt.
Go lang basics, Now I can read and understand Go lang and call myself Gopher on Twitter 😉
CLI animation and general working of CLI tools.
How to set and get environment variables with the help of CLI commands.
1password and how to use 1password CLI.
I will soon make a video version of the examples and this article in general, so stay tuned for that meanwhile make sure to check the project and open Issue if you found any bugs and since I did not have a laptop has either a fingerprint scanner or windows hello. I was not able to test that, anyways it works fine with password-based auth in Windows. And Linux and Unix are yet to be tested.
Important links.
latest release: 👇
![]()
Source code: 👇
![]()
I think this covers it, comment down 👇 your queries and suggestion about the project, article, my way of writing in general anything that you want to know.
Till next time kudos, 👋
Some Important domains and tags.