Highlighter never forget a important stuff || AWS Hackathon submission.
Focus on learning rather than remembering things, Highlight the important things and let us remember it for you.

Just a developer exploring the tech world, learning and sharing what I learn.
Hello, there 👋
It has been a while, isn't it? Anyways I am back with yet another interesting project. I hope you will enjoy it. For any suggestions, appreciation and criticism comment section is all yours. Your suggestion will be heavily appreciated. Do let me know about your thoughts on the project.
A project is a good project if it solves any problems and helps you in your daily life. I believe in building projects not only for my portfolio or to win the hackathon but to make an impact in a person's day-to-day life. So let us start with the problem and slowly we will move towards the solution and how I came up with the solution.
This is going to be a long article sit back and relax and let's embark on the journey that highlights the highlighter's highlights while building highlighter. Twisted 👅 right??
Problem :
Suppose you are a tech writer, a learner, a student, a developer, a simple person browsing and researching on the web, a professional blogger writing articles or even a voracious reader who eats articles as breakfast and documents as dinner. What do all people have in common? Yes, you guessed it correctly, It's pages and pages worth of writing both important and nonimportant. As humans in this era, we tend to read information online more than we do offline. So, what is the problem here??
Let me explain.
Case Article Writer/Reader :
Suppose you are writing an article on cats, (who does that 🤫). First of all, you will need to research about the cats, and while researching you will need to read a lot of things and then you will probably start writing the things but before starting to write things you will store that researched information somewhere, which may be a notion page, a text document or even the article publishing site itself. But what is the problem here? The problem is it is both inefficient and manual. What would you do if you had a physical book on the psychology of cats? You would most probably use a Highlighter to Highlight the important stuff.
Case Developer :
Suppose you are a developer like me, and you are reading an article that tells you the top 20 typescript tips that you must know. You are not really using the typescript in the current project but plan to use it later in the next one. What do you do with the information, Although the information is very important, you will forget that you ever read such things when you start the next project. Or you found an awesome methodology to follow in the next project or something that you will need in the future what do you do? You will either physically note it down, or use a notion or something like that to store the information. Which is both manual and an extra step to take care of while you are consuming the information.
Case Student :
Suppose you are a student preparing for an upcoming exam, making notes or even writing a project/research report. You will read a lot of things and what will you do to regain or retain that information, surely you cannot recall all that you have read, so you will require to store that information somewhere you can access efficiently and effortlessly. What do you do? Physically write the important stuff, store it in the notion or something like that?
Generalization :
As I already told you in the previous article's blog post, about how our memory works and how we tend to consume information.
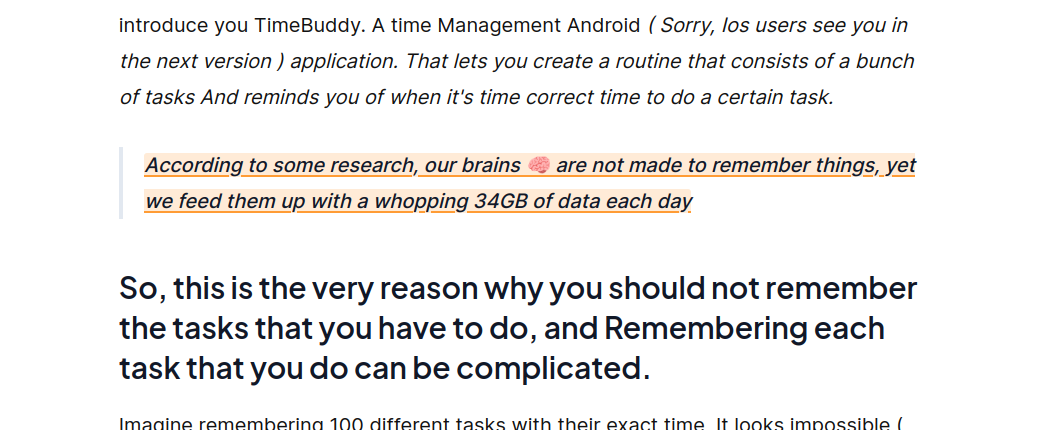
PS: go check out the article if you haven't already: 👉️ Here
As I found researching online that we tend to start forgetting things the moment we consume them and the information that we consume daily is equivalent to the information given by about 174 newspapers daily. And a general person forgets things due to no active recall and information overwhelming. But it can be controlled by efficiently storing it and making it attractive and easy to do so. So much so, that we don't need to use too much of our brain and time to do so.
So then what to do?
Solution:
Introducing Highlighter, a web extension that lets you highlight information and store them efficiently so that you will never need to worry about forgetting the important stuff. And keep on learning the stuff that you want without the fear of losing them and can easily get them back whenever you need them.
Key features:
The main features of the Highlighter are as follows:
Highlight the text.
Choose the color that you like.
Add your favorite color.
Choose a topic.
Add a new topic.
Search the Highlighted text. It has a full-text search engine built in and it's fast.
Activate and deactivate the pen.
Decide the formatting of the highlighted content.
Efficient storage of the highlighted text.
Highlight anywhere and access everywhere.
Live locate the highlighted data.
Optimized for speed and productivity and includes shortcuts for everything.
Let me explain each in a bit of detail, so you can understand each feature.
Highlight the text.
Once you have installed the extension and provided the proper permission to access the site's data, you will be able to toggle a switch to activate the highlighter pen and then whenever you highlight the things, the data that you highlight will be stored both in the extension state variable which lives till you quit the browser or delete the extension, and the dynamo db in the AWS cloud.
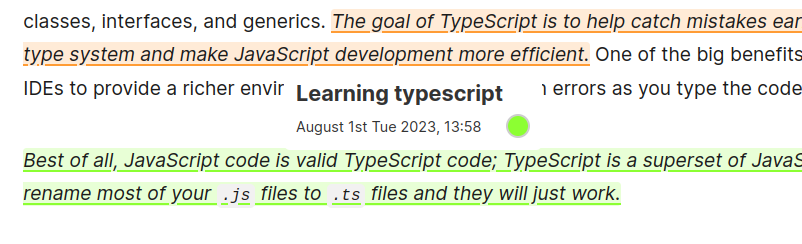
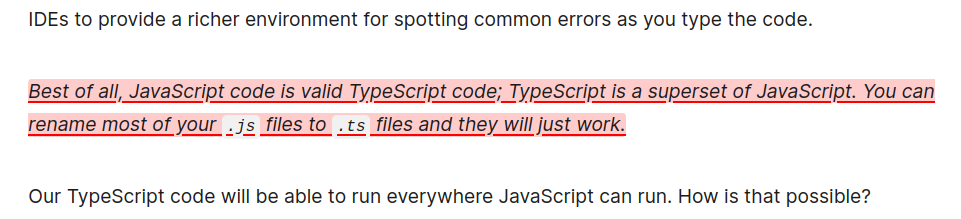
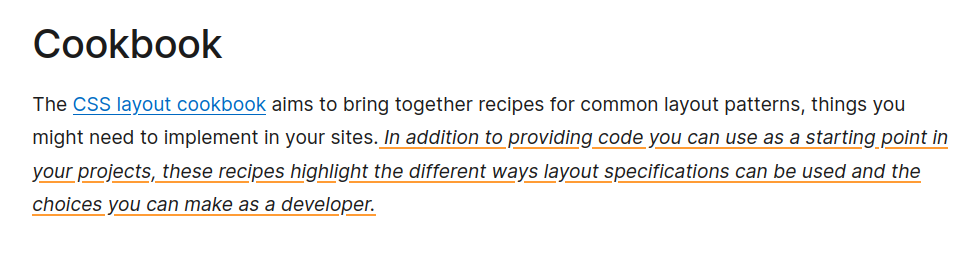
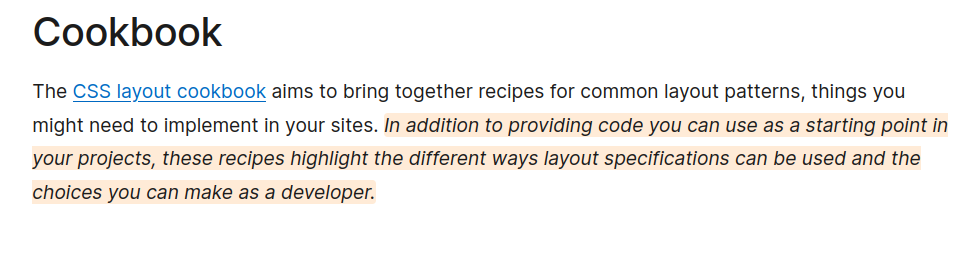
When you highlight the text, the selected text will be beautifully styled. With the color that you have selected. And will now be interactive with a hover event that will let you know when and under which topic the data is highlighted.
Here is an image to explain what I mean by all this
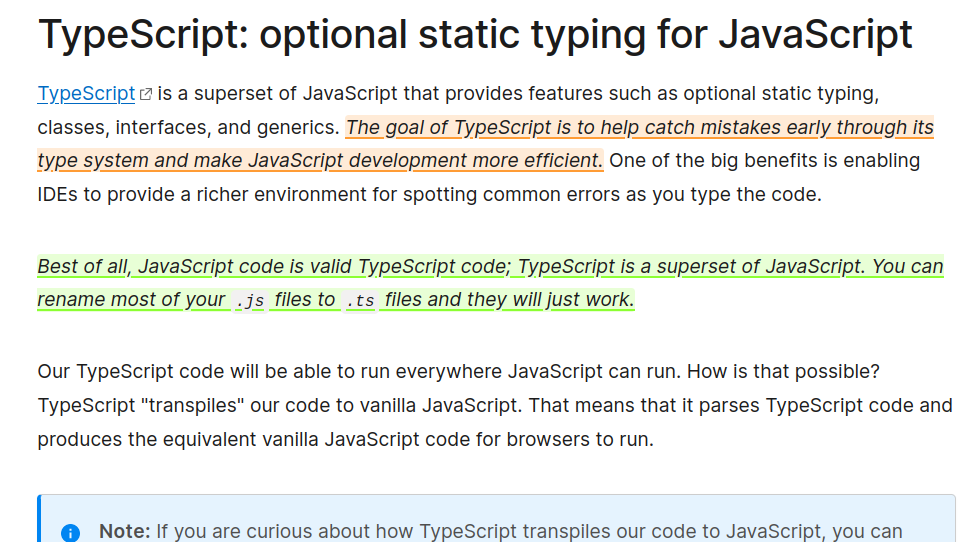
The things that you see in the color orange and green are the important things that I need to know now when I hover over them I can exactly know when I made the highlight and under which topic and color I do that.
This is how you can Highlight the text, using the highlighter.
Choose the color that you like.
You can use a keyboard shortcut to quickly and easily add and select the color that you like. The default keyboard shortcut is CTRL + SHIFT + SPACE pressing which will blur your entire page and show you a search box with some default colors to choose from, you can navigate with your keyboard using the arrow keys or search for the color that you like if the color does not exist then it will be added in the extension under your name and will be automatically be set as an active selection.
Here are some images to better understand what I mean by that.
This is what you see when you press the keyboard shortcut.
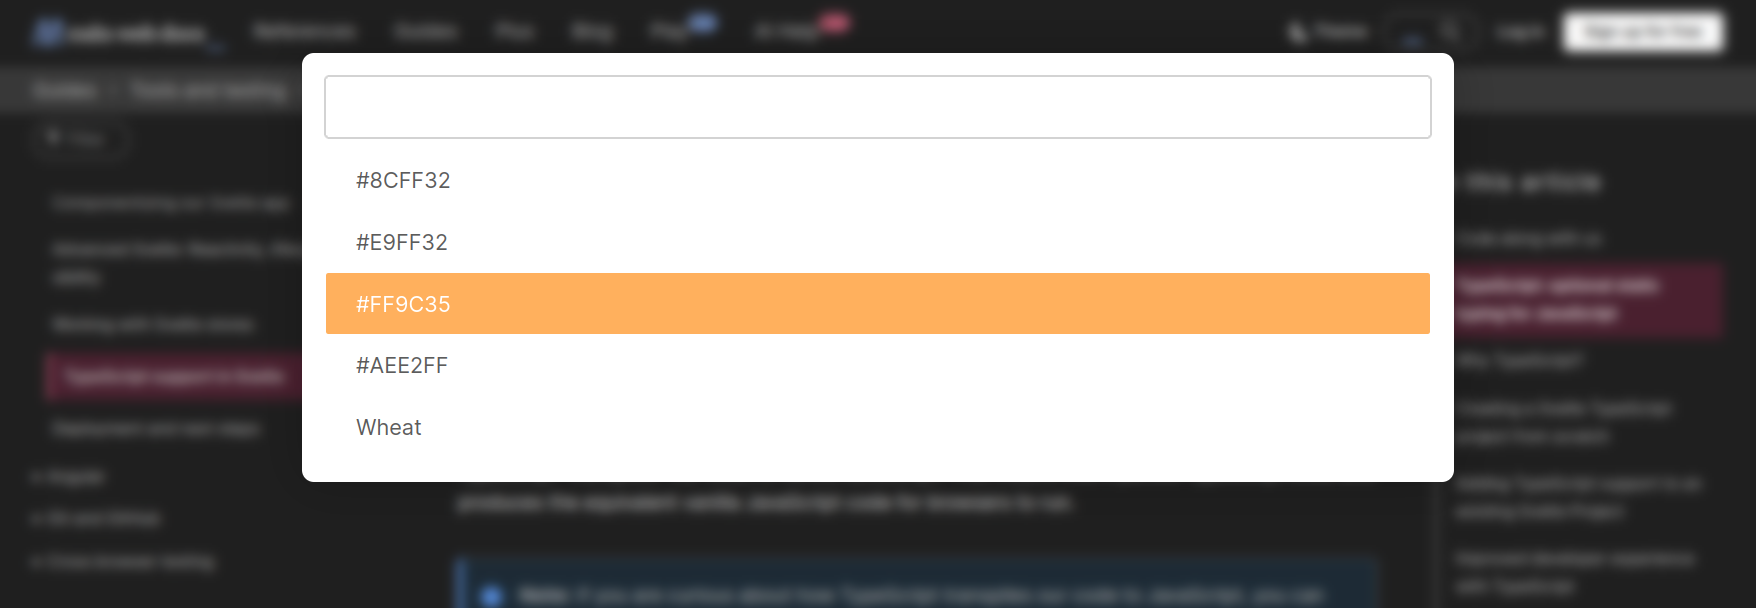
Let's say you like the red color the most so now you can search for the color red, keep in mind all color formats are supported, including Hex code, Color Name and even advanced and unusual formats such as RGB, RGBA, and HSL. Let me show you by searching in red color.

Now when you press enter you can use the color to highlight the text. Like this:
This means you can choose the color you like and the extension will generate the style accordingly.
Create and Choose a Topic :
You can create a topic according to the type of content that you are recording or highlighting. This will help you organize your highlights and filter them accordingly let's say you are writing a blog post on the topic about how to win a hackathon, and you are researching for it. Then it makes more sense for you to be able to group that data.
You can see the topics by using the Keyboard Shortcut CTRL+ALT+SPACE then you can use the keyboard arrow to navigate to the topics that are present there or search or type the topic that you want to create. Here are some images to better explain it.

This is what you see when you use the keyboard shortcut, and then you can either navigate or search to reduce the results and select or create the topic that you want.
Let us create, A topic called How to win a hackathon. To do that we will simply type the topic name and press enter to create the topic.
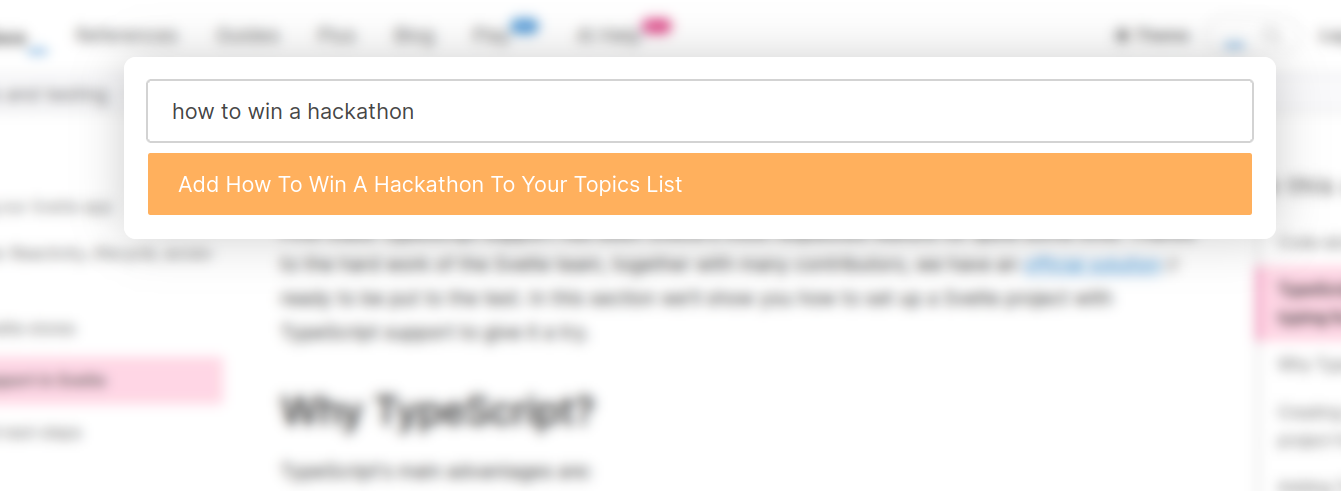
Now, if you press enter it will automatically be selected and you can now select the text which will keep the selected text under how to win a hackathon topic.

This is what it will look like. Now you can create topics and sort them accordingly.
Search the Highlighted text.
It has a full-text search engine built in so you don't need to worry about you losing your information as long as you remember either any of the following information:
Date of highlight.
Any word from the highlighted data?
Highlighted color.
The topic under which the data was highlighted.
Site from where the data was highlighted.
You can quickly search data, by using the shortcut CTRL+SPACE. This is what you will see when you use the shortcut after recording some data.

you will see all the data that you have highlighted that is from the same domain that you are in, and now you can type any keyword in the search box to sort the result, let me show you by searching for something that exits and does not exits.
Something that exits:
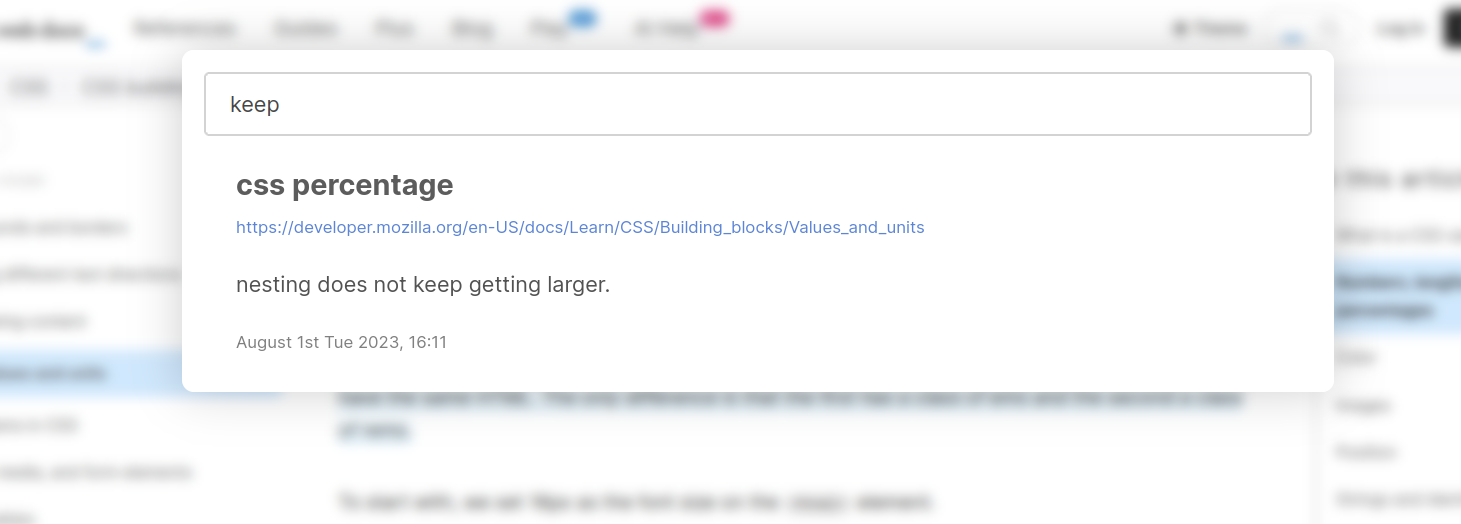
Something that does not:
You will get the following output.

The search isn't perfect but it is good and fast, I am planning on adding which word was the match and which was the triggering element for the search. Even though it's not perfect. It's good, very good in fact that you will never feel a lag and never have to wait, and correct enough that you will never get in a situation where you do not find anything that you have highlighted.
Activate and deactivate the pen.
While reading some people have a habit of selecting the text, just without any reason. So, if you ever need to deactivate the highlighter you can use the keyboard shortcut CTRL+ALT+P to toggle the state of the pen. This means you can choose whether you want the highlighter to stay active or stay silent. And turn it on when you want to highlight the important stuff.
Using the keyboard shortcut will toggle between the on and off state.
Decide the formatting of the highlighted content.
You can decide how your highlighted content looks, you can change the color and the way it is styled. Here is the list of setting that you can play with to find the best one for you.
Disabling Visual indication.
Underline as a visual indicator.
Underline and transparent background as a visual indicator.
Transparent background as a visual indicator.
When you open the extensions popup page you will see the 3 toggle buttons. Highlighter, Activate background, Activate Underline.
Toggling the Highlighter will control the pen mode as mentioned above, And Activate Background, and Activate Underline will toggle the respective background and underline modes.
What do I mean by this? let me you the images to help you understand this feature.
This is what you will see when you open the popup of the extension.
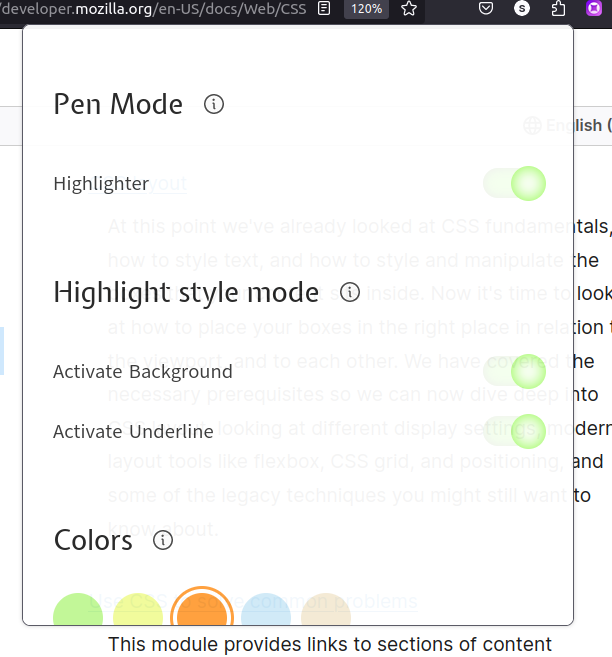
If you toggle the Activate Background to false then the highlighted data will only be styled with the selected colors underline. Let me show you. The background mode is off.
Now if you turn both the modes off then you will not get any visual indicator but the hove effect will still work. And all the previously highlighted data in the site will follow your current settings, meaning if you highlight something in no background mode and now if you turn the background mode on then you will be able to see the background for that highlighted data as well. And it will match the color that was selected at the time of highlighting.
let me show you how it looks when only the background mode is on.
it's totally up to you how you want to customize the highlighted data.
Efficient storage of highlighted data.
You might see it simple but it's not that simple to store such data, first, the selected text is extracted both with and without the markup and all the global states are extracted and the current time is taken, and after that, it is appended to a local db created using Orama, And along with that the Xpath of the selected item's parent is calculated for reverse and re-highlighting purposes.
And then the data is sent to the AWS Dynamo DB, through a graphQL API which was made possible by the AWS Amplify studio's help.
It would not have been possible to generate such an easy database connection with graphql API if it wasn't for AWS Amplify. Why you might say?
I had only heard about graphql and making a graphql API from Scratch is hard, You will need to write a lot of code, and when you are under a time boom then it's very hard to complete. It's nothing like I cannot do it, but learning and making things that you have only heard of may sound good but when there are 20 different things that you need to learn it's simply a pain. Anyways I lost track. So, I was saying this is how the data is stored and whenever the browser gets a cold boot. The data is fetched, this is how you get in sync with the cloud.
Highlight anywhere and access everywhere.
We are in version 1.0.0 of this extension and at this time it is only optimized and tested with the firefox browser and will be available for all other browsers in version 2. Even though that is the case it is not just limited to your computer. As long as you know your login credentials, you can just log in with those and walla, you got all your highlights backed up with you again. And you can continue your research again.
This means you can Highlight anywhere, at your home, office, or cafe and you can access your information everywhere. This feature was only possible due to AWS Amplify and the auth service providers they provide. I will be writing about all the things that I have used from the AWS Amplify Studio in the next section. Till then hang on tight.
Live locate the highlighted data.
When you highlight data you don't need to worry about storing them, We do it efficiently I already explained it above. And if for some reason you want to find the source of highlighted data. You have a live locate button which will take you to the exact location where the data was highlighted.
Let me show you an image. To better explain this.
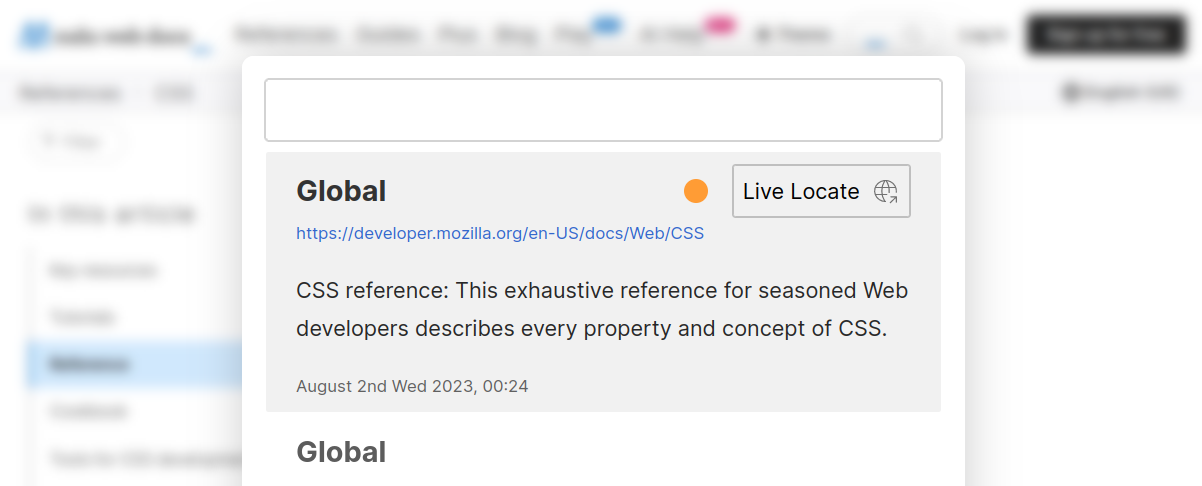
If you press on the live locate button you will get to the exact site and the exact location with a smooth scrolling effect where the data was highlighted from. It can be really useful when you want to learn more about the important thing that you highlighted let's say months ago.
Fully optimized for speed and productivity.
It means you can use shortcuts to quickly navigate through the settings, and change them while the main focus will be gaining and retaining the information. It has a minimal and customizable UI which will help you learn better, as highlighted data has more tendency to be stored in your long-term memory due to good retention of data which are caused by the highlight.
Here are the default keyboard shortcuts to make your workflow super fast and productive.
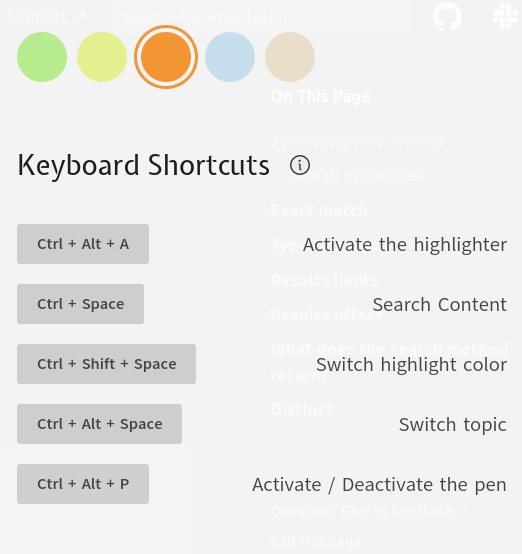
You might feel like it has very hard shortcuts, but keep in mind these are the best that we could think of that does not conflict with the already existing browser shortcuts.
Custom keyboard shortcuts will be available in version 2.
Working mechanism:
So, after seeing all this you might be thinking how does this work? let me explain it as thoroughly as I can.
Authentication :
For authentication I have used the AWS auth ( Amazon Cognito ) and the UI of the auth is also created using the UI components that come out of the box with AWS amplify studio auth feature. You don't need to worry about a single state of any of the fields and it comes with email, phone number and another verification mechanism, I got to know the true power of AWS amplify studio during this project. I was so blown away by the features that it provided with very little effort, I twitted this.
All the auth is handled by AWS but I wanted to make auth possible in the extension so, I thought of many possible options and decided to follow a simple solution.
The auth is handled by the AWS on the web and then once authenticated the token is stored as a cookie along with other important data, and also sent to the background script with the help of message passing and is stored in the extension storage. I was not able to make the cookie work, I am still wondering and trying to but it was not working. Anyways so, every API request that requires users to be authenticated is taken care of by it.
Data gathering and state management:
When the data is gathered by the extension it is stored in the local database or search engine, I will write a dedicated article explaining how powerful that is. And the gathered data is also sent to the DynamoDb database again in the AWS cloud using AWS app sync graphql API. It was my first time using the graphql api and man that was fun. Apart from the time when I had to manually delete all the... generated by having too much fun...
I have not taken care of the data once it is uploaded in the DB, reason when the extension loads again it will fetch the data from the DB. And when it is still running background script has a local db as well. Let me show a general data flow diagram.

I think this makes it a bit more clear, this is how data gathering works and for the state management, the states that do not require to be searched such as toggle buttons are stored in a global object while those which require search are stored in a separate db each.
Roll of Aws Amplify in this project.
To be honest this project was possible without AWS to amplify but when you think that way you will find yourself completing this project after a couple of months not a couple of weeks. coding a Graphql API and consuming it and managing auth are very easy to do if you want to do them right they take time. Here are the things that I have used from AWS Amplify in this project.
Aws Appsync
I have used graphql api to power this application, without the api as the backbone the persistence of the application was not maintainable. After the introduction of Manifest version 3 in extensions background scripts are not allowed to run continuously after installation to their entire life span. Rather, they are allowed to run continuously until the browser is closed. After that, it will start with a fresh set of states. So, to maintain the state of the application it is important to store the data in the database. This is where the AWS Appsync plays a huge role and while switching browsers or computers you want your states to be the same. Your data is to be synced so it is a must to have a api backing your application.
This is the schema of my graphql api, and Although it was my first time using both AWS appsync and the graphql api it was fairly easy. So, easy that you can set it up within 1 day with authentication and other UI features as well.
  type Highlight @model @auth(rules: [{ allow: owner }]) {
    id: ID!
    xpath: String!
    data: String!
    color: String!
    domain: String!
    time: String!
    topic: String!
    htmlMarkup: String!
    user: User @belongsTo
  }

  type User @model @auth(rules: [{ allow: owner }]) {
    id: ID!
    settings: Settings @hasOne
    active: Active @hasOne
    highlights: [Highlight] @hasMany
  }

  type Active @model @auth(rules: [{ allow: owner }]) {
    id: ID!
    topic: String!
    color: String!
    pen: Boolean!
    background: Boolean!
    underline: Boolean!
    user: User @belongsTo
  }

  type Settings @model @auth(rules: [{ allow: owner }]) {
    id: ID!
    colors: [String]!
    topics: [String]!
    user: User @belongsTo
  }
I believe if you are into programming you will surely understand the above code even though you have not written a single graphql api. And you don't need to think about the operations or modifying the api endpoints like in a rest api. All the resolvers and functions are created by AWS.
It's like this:

AWS does all the heavy lifting for you for the above schema it generated, More than 50 functions and resolves to handle all the changes that you might need.
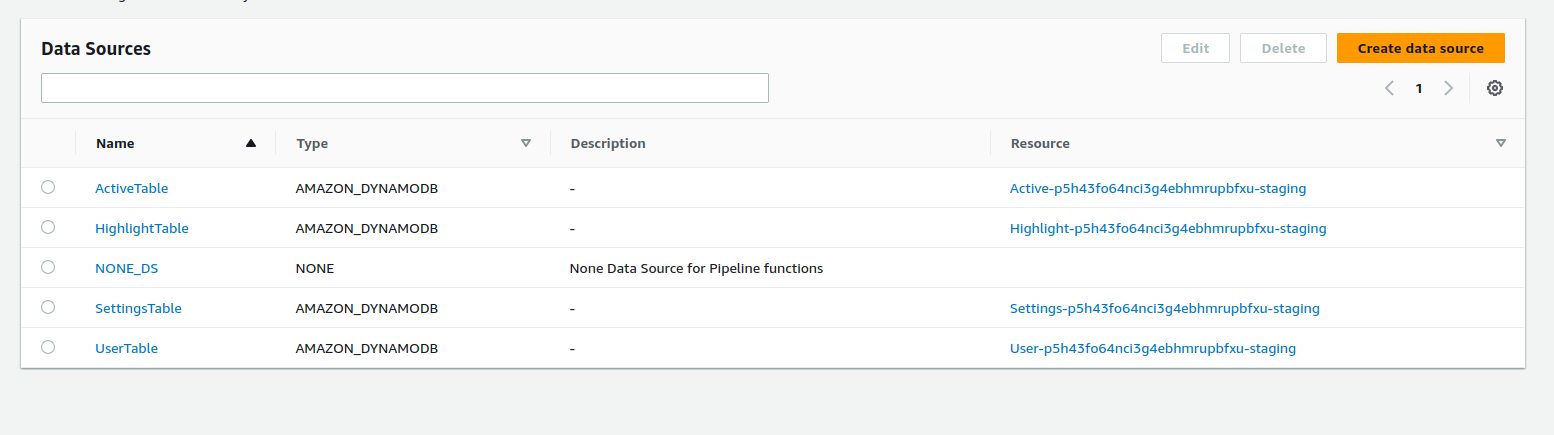
Dynamo Db
While creating the graphql schema you specify each type with
@modelwhich means AWS will also create, a dynamo db table for the type and store it there and you can easily specify the relation between each type using@belongsTo,@hasmany,@hasonewhich are both easy to understand and manage.These are the tables that are created in the dynamo db database.
Data Model
So, if you are completely new to the api and all those things then AWS amplify studio has a data modeling feature that lets you design the way you store the data without writing any schema, It's very handy to design the data model and visualize your schema. Here is the data model view that was auto-generated.

You can use the visual editor to manage your data model and their relation without ever touching the schema of the api. It can help you reduce the error that may occur while using the schema or manual mode as well.
Amplify Hosting
Guess what all the task is handled by the AWS amplify, along with the hosting of the both backend and the frontend all the data resolvers to ui components are generated by the AWS it's like a no code now, Although it's already a great low code. You can deploy a scalable application within a matter of days, or hours depending on the scale of your application. And it even gives you the link to the site or the backend through an api, without any charges.
UI library for generating the Auth UI
It's by far the best thing that AWS offers, it handles all your authentication with a verification system and supports multiple fields such as address, phone number, and username. And many more you can either use the given UI or use the auth API to integrate with your own UI.
Let me show you this is a single line that you will have to write to render the fully functional auth UI with all options, like forgot password, signup, login and verification after signup.
  import { Authenticator } from "@aws-amplify/ui-react";

  export const APP () => {
  return <Authenticator />
  }
So, that's it let's see the output that we get from that line of code.


Do keep in mind all of this is customizable and all the things shown in the image work. And it's just one line of code. It's just amazing.
Authentication
Now the auth UI is complete by the way I have my custom style which you can see in the link below, but after the UI is complete let's talk about the functionality. All the user handling is done by the AWS itself but I do need to authenticate my Extension so when the Auth is complete the application goes through a sign in state and once that is complete I send a request to my extension with the
authTokenwhich will be used to query the data from the api. And you might have noticed a rule in the api schema as well which indicates that the sign-in user will own the data created making it impossible for other's to access their data, which is a feature that means I can now call list all the highlights and those which belong to my account will be listed and others will not be listed, no more sending the id of the user and filtering them manually.type Highlight @model @auth(rules: [{ allow: owner }]) { id: ID! xpath: String! data: String! color: String! domain: String! time: String! topic: String! htmlMarkup: String! user: User @belongsTo }this schema states that only the owner will be able to modify or access this data.
Ok let me show you the initial screen of the extension when you are not logged in.
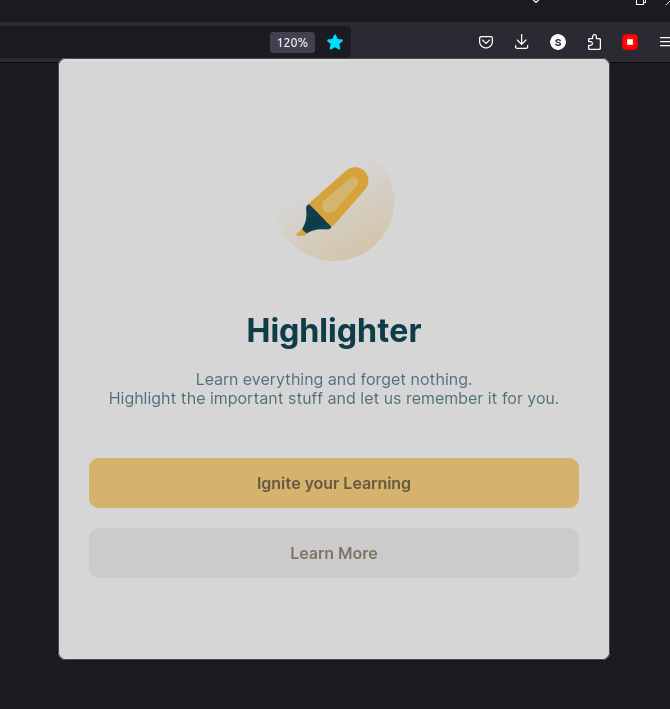
And when you press ignite your learning you will be taken to the auth screen of the website, and then you can create a user or you can continue with the test account. The authentication is backed by AWS.
Here is the auth screen.

This is what the main landing page looks like:

Just check it out by visiting the link given below. I will love to see you there.
I have tried my best to make the site as minimal as possible.
Challenges
There were a lot of challenges that I faced during the development of this project, building it without Aws was one of the greatest challenges and then integrating the specific needs of the Aws was another challenge. Although I pretty much like the AWS Amplify studio and the features that I get from them and keep in mind for free. I don't like the way hosting works.
Here is why.
If you are hosting an application using React isn't it known to everyone that it is almost always a single-page application?? So, why not add a default rewrite of the paths to the index file or the entry file? If someone wants to change that they can. Defaulting to not rewriting will affect 90% while the other will just 10%.
The main challenges were, making the extension work and handling all the states. I mean I had to write almost 20 if not more messages just for the communication with background script.
see this tweet.
Here is a list of challenges that I faced.
Getting the selection with the back trackable location, I went for Xpath generation.
Handling the states in the extension.
Using Orama in the extension for text-based search.
Using Ts and React for extension development.
Implementing the graphql api.
Custom storage and refreshing of the cookies and handling the auth state.
Hosting and making it live.
Videos
Here are some videos for you to learn about the project more easily. Ignore the bad audio quality and non-edited format.
Introduction to the developers.
Saroj Regmi full stack developer, learner. 👉️ github
Sushil Bhattarai Best designer, and full stack developer. 👉️ github
Testing and submission review:
Here are the test account credentials for the judges and others who are curious about the project to test it out.
Id: test
Password: 9_7}Qip!r>^xT7Q
Note the extension is not uploaded and made for google chrome or any other browser except for Firefox.
Important domains and Links to check out:
Website: https://main.d2a7w27zjiogab.amplifyapp.com/
Extension: https://addons.mozilla.org/en-US/firefox/addon/_highlighter/
Github Repo: https://github.com/sarojregmi200/Highlighter
Hashnode: Hashnode
Extension: Aws Amplify


